How to Activate AppleCare

how to activate applecare

Are you looking for a guide that explains how to activate AppleCare ? Very good, you found it! In this tutorial we are going to show you the whole procedure to carry out to achieve your goal. This is nothing particularly long or complex: in a few simple steps you will have achieved your goal. So, take five minutes of free time: once you’ve finished reading, you’ll have a clearer picture of what you need to do. Are you ready? Perfect, let’s go!

How to activate Applecare

activating applecare

You recently purchased your first iPhone, and initially you preferred not to have the additional warranty offered by the Apple company. However, once you completed the configuration of the device, you thought better of it and decided that you wanted to activate the warranty offered by the AppleCare service. And it is precisely for this reason that you came across this guide: because you are trying to understand how to activate Apple Care .

In the next few lines we will provide you with all the instructions to do this, from the requirements necessary to enable the service in question to compatible devices, and then move on to the activation procedure in the strict sense. But no more hesitation: make yourself comfortable with your iPhone and take a look at what we will tell you below. Enjoy the reading!

Activation requirements

Before going into the details of the operations to be carried out to activate AppleCare , it is necessary to find out the requirements necessary to use the service, through which the device’s warranty can be extended. First of all, you should know that AppleCare+ can be activated on iPhone, iPad, iPod, Mac and Apple Watch, and includes two years of assistance (three for Mac) from Apple technicians and additional hardware coverage, with the possibility of taking advantage of up to to two interventions for accidental damage with lower repair costs than normal (e.g. 29 euros to repair the display of an iPhone).

AppleCare+ can be activated either at the time of purchase of the device or within 60 days from the date of purchase. As for Apple TV, it is possible to request the activation of the AppleCare Protection Plan : you will then have two years of technical support from experts and other hardware assistance options. This service can be activated at the time of purchase or within the following 12 months.

Having made this quick mention of the requirements and the various plans, we can now go and see how to activate AppleCare in detail. You can do it online on the official Apple website, completely independently and with your Apple ID, or by calling the company’s technical assistance and getting help from a consultant.

Online procedure

Is your intention to activate AppleCare online, without having to make a phone call to the support service? Excellent, first connect to the official Apple website , then click on the “Log in to My Support” button, enter the required data in the Apple ID and Password fields, then press on the arrow icon pointing to the right to log in with your Apple ID.

You will see a screen called “My devices”: here select the device for which you want to extend the warranty by clicking on it. If the device in question is eligible for AppleCare activation, click on “Add coverage” and ” Buy AppleCare “. You did it: it wasn’t difficult at all, right?

Procedure via telephone

Are you not very familiar with the online procedure or do you simply prefer to be supported in activation by an operator? No problem, you can contact Apple technical support and request service. Please note: write down the serial number (IMEI code for iPhone and iPad) of the device for which you want to extend the warranty. This is a code made up of 12 alphanumeric characters (15 in the case of an IMEI code) shown in the packaging and in the Settings of your device.

Once you have retrieved the code in question, take your phone and call the number 800 915 904. After listening to the welcome message, say the command “AppleCare” and the name of the device (e.g. iPhone) on which you want to activate AppleCare. Now all you have to do is say or type the IMEI code or serial number of the device you are interested in, and wait for the response from an Apple consultant. You can request the activation of AppleCare from him.

How to activate AppleCare: conclusions

You should now have a complete and comprehensive overview of how to activate AppleCare . We hope that our guide has been useful to you and has helped you to dispel any doubts. Until next time!

How to use Google Docs as a Journal

use google docs as journal title

Google offers a great list of tools and websites that are realy productive. You just need to use them smartly and believe me, the experience will be amazing. Here in this article, we will help you out to proceed in a way with which you will be able to use your Google Docs as a Journal. Yeah, you heard me right. You can follow a simple way out to use the online Google Docs as your daily diary easily.

use google docs as journal title

How to use Google Docs as Journal

Time needed: 5 minutes.

Steps to use your Google Docs as a Journal

  1. Login to Google Docs and Open any Blank Document.

    You may proceed to use Google docs on any of your device. Let it be your laptop, iPad, mobile phone or any other device that can use your web browser or can install Android or iOS apps.use google docs as journal

  2. Enter the date with which you want to add an entry in your Journal.

    A typical journal will include the dates and the content with it. The first thing to do is to add a date. This date will also solve the purpose of navigation and will enable you quickly jump to any date of your choice.use google docs as journal step 2

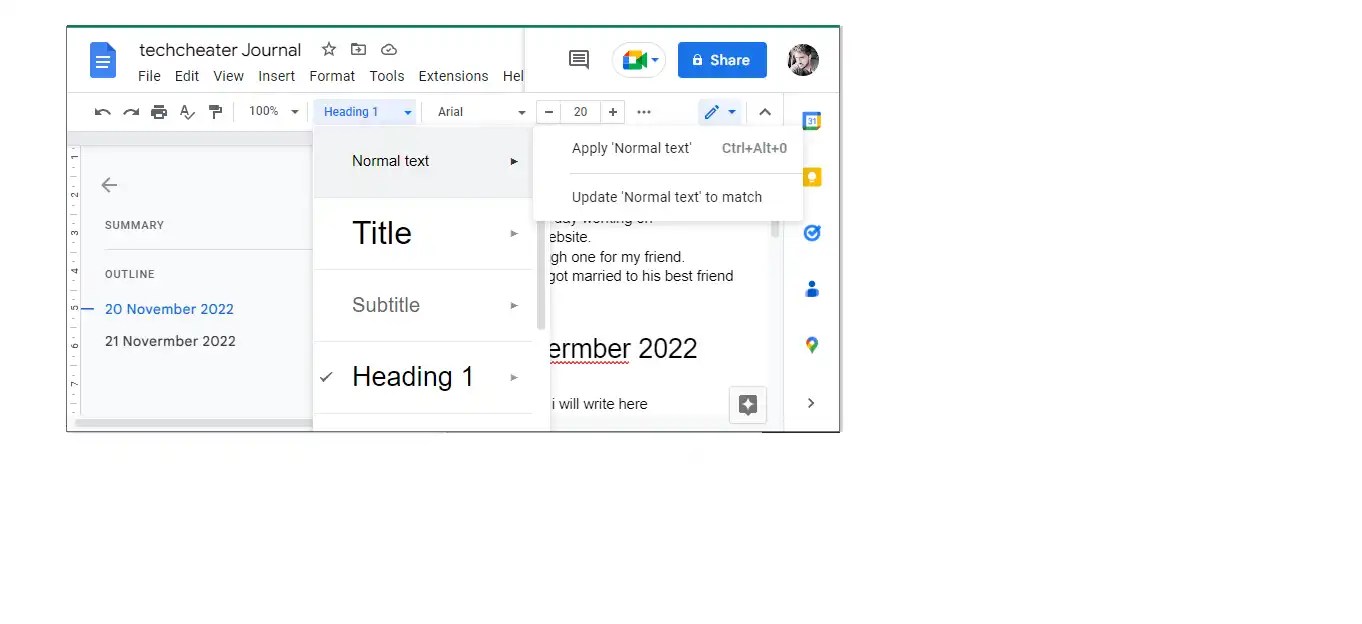
  3. Classify the date as Heading (Heading 1 / Heading 2 or so on)

    When you select any Heading, then it will start showing up in the left pane of your online document. Technically, this solves as the purpose of scroling / navigation.

  4. Start entering the content

    Once you enter a date, you can start entering the content below it. This will be the content of your Journal.use google docs as journal step 4

  5. Save the document and keep on updating regularly.

    This document will be saved online and just like any other Google Docs content, will be accessible from cross devices. Start entering the content and that is it. This way you will have your Journal ready with the Google Docs.

Benefits of using Google Docs for maintaining your daily Diary

  1. Free to use.
  2. Available cross platform devices.
  3. Provides seamless advantages of adding cross platform data from Youtube, Blogspot etc.
  4. Lets you add images.
  5. Excellent tools for formatting to enhance user experience.

Also Read : Change your Google language to your native language with this guide.

How to sync Gmail contacts with iPhone

How to sync Gmail contacts with iPhone

This article will guide you to sync your Gmail contacts with Apple iPhone. The steps are same for all the iPhone models. Let us proceed to read the details.

How to sync Gmail contacts with iPhone

Also Read : How to change language on Google drive?

Steps to sync Gmail contacts with your Apple iPhone

Step 1 : Open your iPhone settings and then go to Mail and further to accounts.

How to sync Gmail contacts with iPhone

Step 2 : Now click Add account -> Google and sign in with your user credentials.

Steps to sync Gmail contacts with your Apple iPhone

Step 3 : Click on Contacts and toggle the switch to on. This will sync your Gmail contacts with your iPhone.

Important

If you face any issues, you can drop down your comments below.

Also Read : How to cancel ExpressVPN subscription.

How to change language on Google Drive (iOS, Android, Mac, Windows)

How to change language on Google Drive

Whats up guys! I will guide you to change your default language on your Google drive. No matter, which device you are using, you will be able to change your language as per your desire. Let us see the details below.

How to change language on Google Drive

Also read : Way of unenrolling from Google Classroom

How to change language on Google Drive

  1. Launch Google Drive website on your device web browser.
  2. Now click on the settings option (Gear Button).
  3. Go to Change Language settings option.
  4. Select the language of your choice.
  5. That is it.

This will help you save the default language. No matter, which device you use, you just have to ensure that you open the website in your web browser.

How to install & use Bbox on TV (Samsung / LG / Sony / One Plus / MI and more smart Televisions)

How to install & use Bbox on TV (Samsung / LG / Sony / One Plus / MI and more smart Televisions)

You may use Bbox TV on your smart TV. No matter, which brand you have, you may still be able to use it on your favorite device.

How to install & use Bbox on TV (Samsung / LG / Sony / One Plus / MI and more smart Televisions)

How to use Bbox on every smart TV

  1. Connect Bbox Miami TV decoder box to power supply and with TV using HDMI port.
  2. Turn on the TV and it will start a setup.
  3. Select your region & Language.
  4. Select the connection port now (HDMI / HDMI2 etc).
  5. Now connect the Bbox to WiFi or ethernet.
  6. That is it. You can start enjoying the product.

You can also sign in with your Bbox TV.

FAQs

How to reset Bbox

  1. Locate the reset button.
  2. Use a pin to press reset button for few seconds.
  3. You will see device restarting on TV.

How to Use Bbox on Samsung smart TV

  1. Connect the Bbox decoder with Samsung TV using HDMI.
  2. Follow the on screen instructions to complete the setup.
  3. That is it.

How to troubleshoot if Bbox is not working

First check if the WiFi connection / ethernet is working proper. You may check this by connecting other device on same internet. If internet is working fine, you may proceed to reset the device. If it does not work even then you may check the HDMI connector. Try replacing the HDMI connector. Still if it does not work, then you may visit the service center.

Also Read : Here is the way of installing VPN on LG Smart TV

How to check your Apple gift card balance

check your Apple gift card balance

If you want to know your Apple gift card balance, we will help you out with that.

check your Apple gift card balance

Also Read : How to see Apple music stats

Step by step guide to check Apple gift card balance

On all devices

  1. Go to Apple Gift card balance checker (Click here).
  2. Enter user credentials.
  3. Enter the gift card pin & click check balance.
  4. You will see the available amount in your gift card.

On iOS devices

  1. Go to App store and click your profile icon.
  2. Now click on Redeem Gift Card or Code.
  3. Enter your gift card details.
  4. You will be able to see the balance amount.

Important

Apple ID balance and Gift card balance are different. Do not get confuse while you look for the details.